
入口代码如下:
/**
 * Run the Spring application, creating and refreshing a new
 * {@link ApplicationContext}.
 * @param args the application arguments (usually passed from a Java main method)
 * @return a running {@link ApplicationContext}
 */
public ConfigurableApplicationContext run(String... args) {
	StopWatch stopWatch = new StopWatch();
	stopWatch.start();
	ConfigurableApplicationContext context = null;
	Collection<SpringBootExceptionReporter> exceptionReporters = new ArrayList<>();
	configureHeadlessProperty();
	SpringApplicationRunListeners listeners = getRunListeners(args);
	listeners.starting();
	try {
		ApplicationArguments applicationArguments = new DefaultApplicationArguments(args);
		ConfigurableEnvironment environment = prepareEnvironment(listeners, applicationArguments);
		configureIgnoreBeanInfo(environment);
		Banner printedBanner = printBanner(environment);
		context = createApplicationContext();
		exceptionReporters = getSpringFactoriesInstances(SpringBootExceptionReporter.class,
					new Class[] { ConfigurableApplicationContext.class }, context);
		prepareContext(context, environment, listeners, applicationArguments, printedBanner);
		refreshContext(context);
		afterRefresh(context, applicationArguments);
		stopWatch.stop();
		if (this.logStartupInfo) {
			new StartupInfoLogger(this.mainApplicationClass).logStarted(getApplicationLog(), stopWatch);
		}
		listeners.started(context);
		callRunners(context, applicationArguments);
	}
	catch (Throwable ex) {
		handleRunFailure(context, ex, exceptionReporters, listeners);
		throw new IllegalStateException(ex);
	}

	try {
		listeners.running(context);
	}
	catch (Throwable ex) {
		handleRunFailure(context, ex, exceptionReporters, null);
		throw new IllegalStateException(ex);
	}
	return context;
}
(1)、执行初始化时设置的listeners。这里面首先使用的是org.springframework.boot.context.event.EventPublishingRunListener这个listener来触发其他的listener的执行。
listener的执行过程如下:
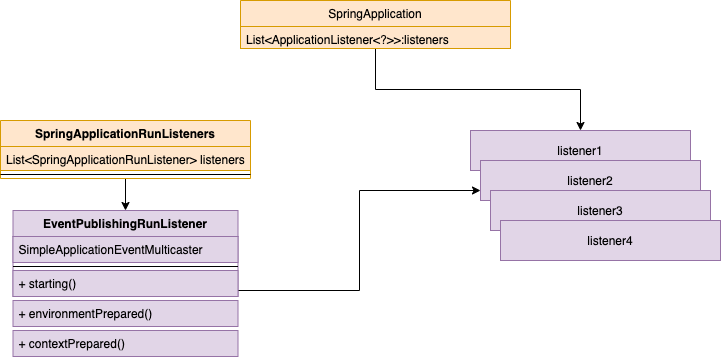
在SpringApplication的run方法中,获取SpringApplicationRunListener,这里面的实现类是EventPublishingRunListener,这个类负责持有所有的listener对象。SimpleApplicationEventMulticaster,这个类负责根据Event类型来筛选出合适的listener。SpringApplicationRunListeners,这个类负责执行所有SpringApplicationRunListener。
(2)、创建ApplicationContext。
protected ConfigurableApplicationContext createApplicationContext() {
	Class<?> contextClass = this.applicationContextClass;
	if (contextClass == null) {
		try {
			switch (this.webApplicationType) {
			case SERVLET:
				contextClass = Class.forName(DEFAULT_SERVLET_WEB_CONTEXT_CLASS);
				break;
			case REACTIVE:
				contextClass = Class.forName(DEFAULT_REACTIVE_WEB_CONTEXT_CLASS);
				break;
			default:
				contextClass = Class.forName(DEFAULT_CONTEXT_CLASS);
			}
		}
		catch (ClassNotFoundException ex) {
			throw new IllegalStateException(
						"Unable create a default ApplicationContext, please specify an ApplicationContextClass", ex);
		}
	}
	return (ConfigurableApplicationContext) BeanUtils.instantiateClass(contextClass);
}
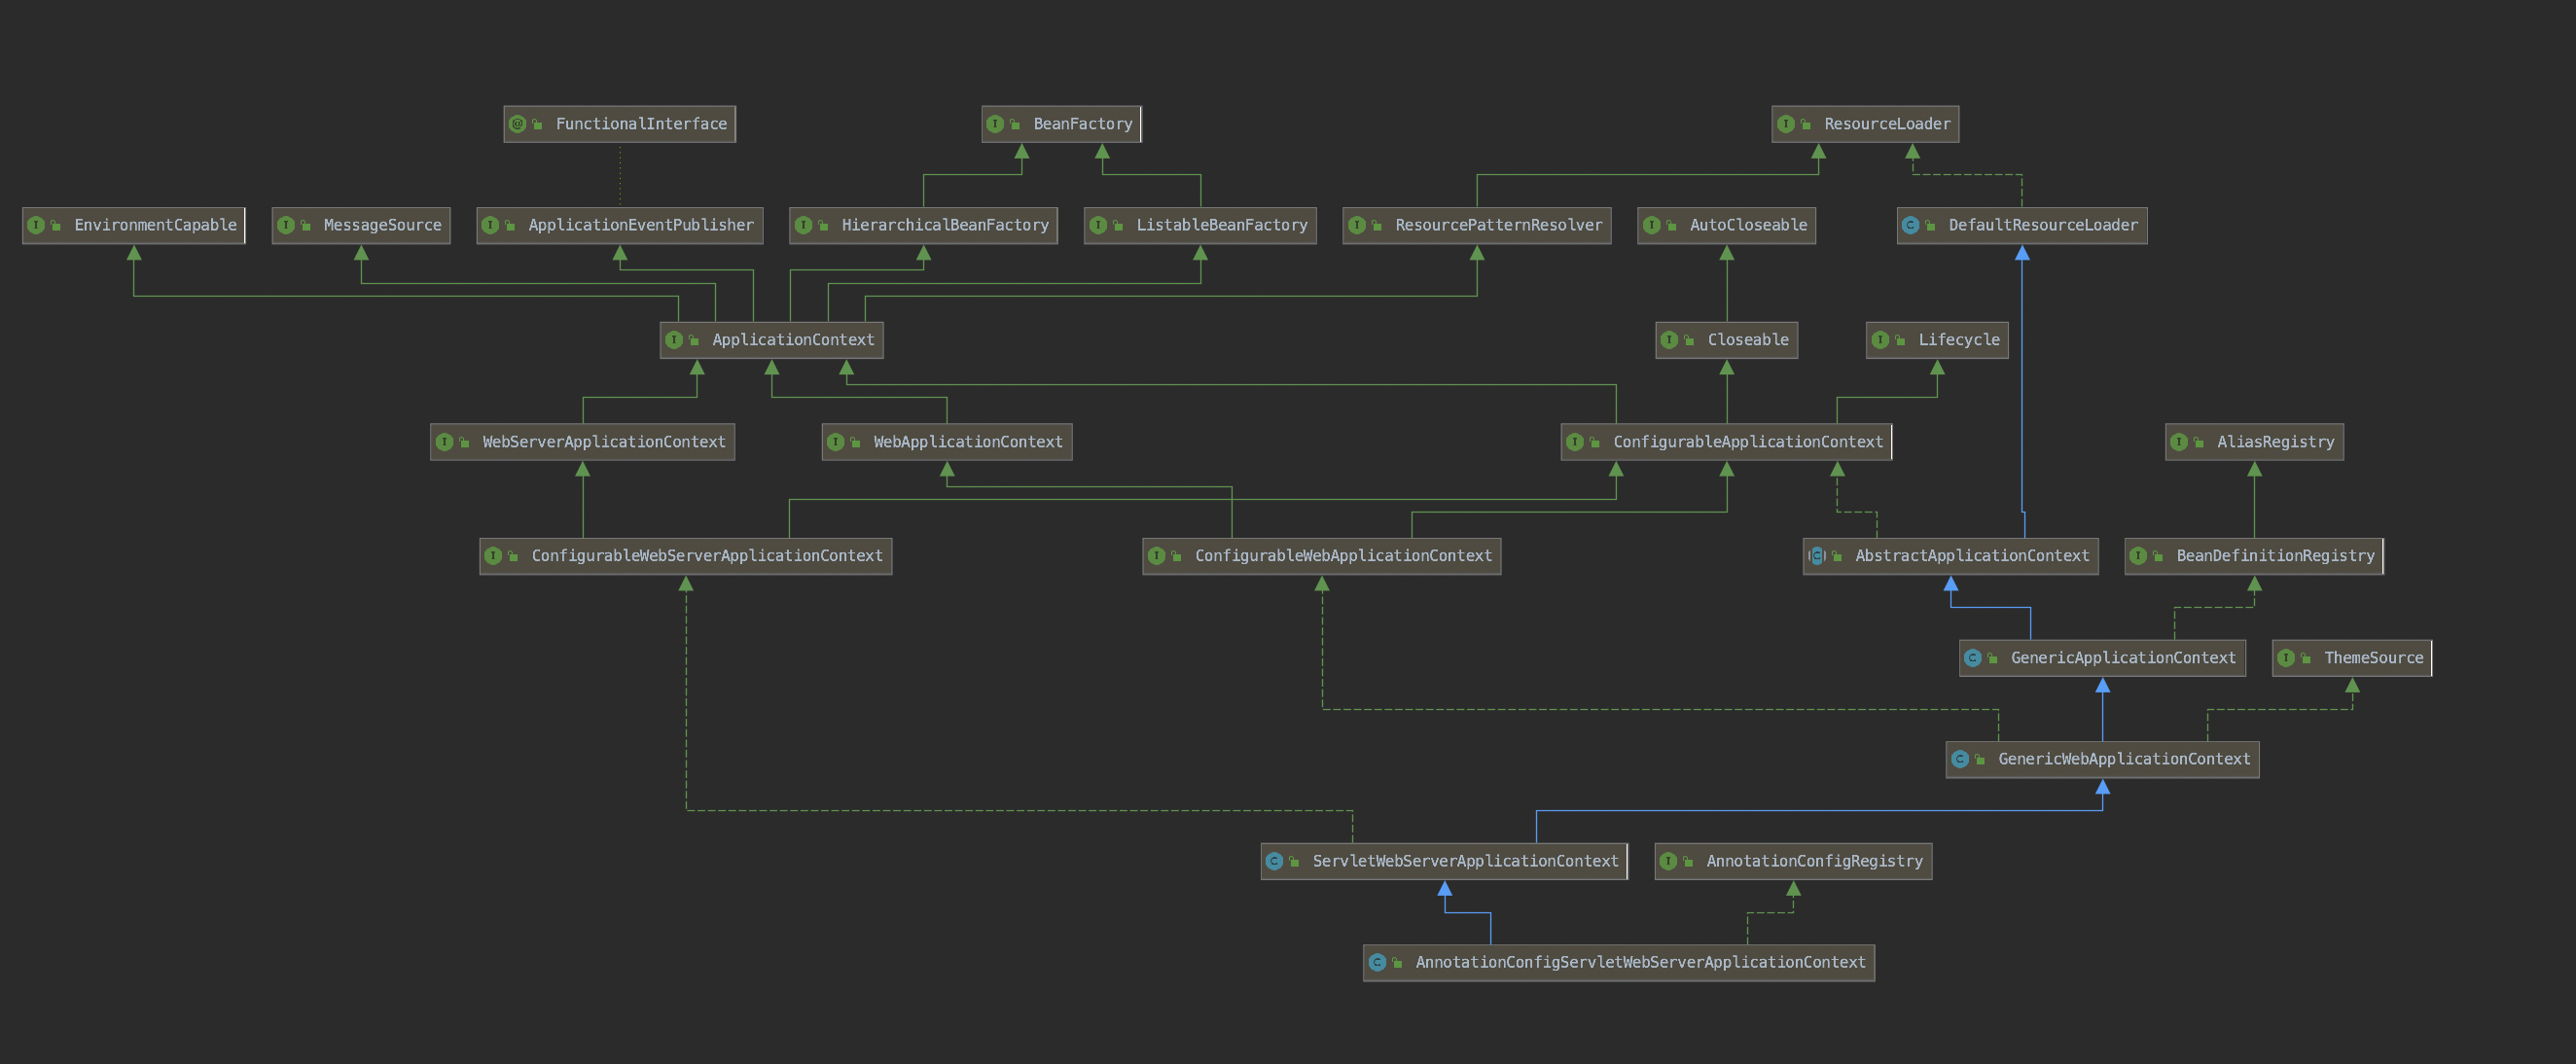
如果是Web环境那么此时会创建
public static final String DEFAULT_SERVLET_WEB_CONTEXT_CLASS = "org.springframework.boot."
			+ "web.servlet.context.AnnotationConfigServletWebServerApplicationContext";
该类的关系如下:
(3)、接下来会为执行创建Environment并填充数据操作。
private ConfigurableEnvironment prepareEnvironment(SpringApplicationRunListeners listeners,
			ApplicationArguments applicationArguments) {
	// Create and configure the environment
	ConfigurableEnvironment environment = getOrCreateEnvironment();
	configureEnvironment(environment, applicationArguments.getSourceArgs());
	ConfigurationPropertySources.attach(environment);
	listeners.environmentPrepared(environment);
	bindToSpringApplication(environment);
	if (!this.isCustomEnvironment) {
		environment = new EnvironmentConverter(getClassLoader()).convertEnvironmentIfNecessary(environment, deduceEnvironmentClass());
	}
	ConfigurationPropertySources.attach(environment);
	return environment;
}
这里比较重要的就是listeners.environmentPrepared(environment),application.properties文件的读取操作就是在这里执行的。详细看下:
具体的读取操作是在ConfigFileApplicationListener类里面来完成的。
@Override
public void onApplicationEvent(ApplicationEvent event) {
	if (event instanceof ApplicationEnvironmentPreparedEvent) {
		onApplicationEnvironmentPreparedEvent((ApplicationEnvironmentPreparedEvent) event);
	}
	if (event instanceof ApplicationPreparedEvent) {
		onApplicationPreparedEvent(event);
	}
}

private void onApplicationEnvironmentPreparedEvent(ApplicationEnvironmentPreparedEvent event) {
	List<EnvironmentPostProcessor> postProcessors = loadPostProcessors();
	postProcessors.add(this);
	AnnotationAwareOrderComparator.sort(postProcessors);
	for (EnvironmentPostProcessor postProcessor : postProcessors) {
		postProcessor.postProcessEnvironment(event.getEnvironment(), event.getSpringApplication());
	}
}

protected void addPropertySources(ConfigurableEnvironment environment, ResourceLoader resourceLoader) {
	RandomValuePropertySource.addToEnvironment(environment);
	new Loader(environment, resourceLoader).load();
}
一路执行到这里,就是读取配置文件的入口了,这里将读取操作委托给一个叫Loader的内部类。
具体配置文件路径的加载顺序如下:
private static final String DEFAULT_SEARCH_LOCATIONS = "classpath:/,classpath:/config/,file:./,file:./config/";
具体执行load操作的代码如下:
void load() {
	FilteredPropertySource.apply(this.environment, DEFAULT_PROPERTIES, LOAD_FILTERED_PROPERTY,
			(defaultProperties) -> {
				this.profiles = new LinkedList<>();
				this.processedProfiles = new LinkedList<>();
				this.activatedProfiles = false;
				this.loaded = new LinkedHashMap<>();
				initializeProfiles();
				while (!this.profiles.isEmpty()) {
					Profile profile = this.profiles.poll();
					if (isDefaultProfile(profile)) {
						addProfileToEnvironment(profile.getName());
					}
					load(profile, this::getPositiveProfileFilter,
							addToLoaded(MutablePropertySources::addLast, false));
					this.processedProfiles.add(profile);
				}
				load(null, this::getNegativeProfileFilter, addToLoaded(MutablePropertySources::addFirst, true));
				addLoadedPropertySources();
				applyActiveProfiles(defaultProperties);
			});
}

private void load(PropertySourceLoader loader, String location, Profile profile, DocumentFilter filter,
				DocumentConsumer consumer) {
	try {
		Resource resource = this.resourceLoader.getResource(location);
		if (resource == null || !resource.exists()) {
			if (this.logger.isTraceEnabled()) {
						StringBuilder description = getDescription("Skipped missing config ", location, resource,
								profile);
				this.logger.trace(description);
			}
			return;
		}
		if (!StringUtils.hasText(StringUtils.getFilenameExtension(resource.getFilename()))) {
			if (this.logger.isTraceEnabled()) {
						StringBuilder description = getDescription("Skipped empty config extension ", location,
								resource, profile);
				this.logger.trace(description);
			}
			return;
		}
		String name = "applicationConfig: [" + location + "]";
		List<Document> documents = loadDocuments(loader, name, resource);
		if (CollectionUtils.isEmpty(documents)) {
			if (this.logger.isTraceEnabled()) {
						StringBuilder description = getDescription("Skipped unloaded config ", location, resource,
								profile);
				this.logger.trace(description);
			}
			return;
		}
		List<Document> loaded = new ArrayList<>();
		for (Document document : documents) {
			if (filter.match(document)) {
				addActiveProfiles(document.getActiveProfiles());
				addIncludedProfiles(document.getIncludeProfiles());
				loaded.add(document);
			}
		}
		Collections.reverse(loaded);
		if (!loaded.isEmpty()) {
			loaded.forEach((document) -> consumer.accept(profile, document));
			if (this.logger.isDebugEnabled()) {
						StringBuilder description = getDescription("Loaded config file ", location, resource, profile);
				this.logger.debug(description);
			}
		}
	}
	catch (Exception ex) {
		throw new IllegalStateException("Failed to load property source from location '" + location + "'", ex);
	}
}


private DocumentConsumer addToLoaded(BiConsumer<MutablePropertySources, PropertySource<?>> addMethod,
				boolean checkForExisting) {
	return (profile, document) -> {
		if (checkForExisting) {
			for (MutablePropertySources merged : this.loaded.values()) {
				if (merged.contains(document.getPropertySource().getName())) {
					return;
				}
			}
		}
		MutablePropertySources merged = this.loaded.computeIfAbsent(profile,
						(k) -> new MutablePropertySources());
		addMethod.accept(merged, document.getPropertySource());
	};
}
这里通过循环获取Resource resource = this.resourceLoader.getResource(location)判断能否获取到配置文件。如果获取到就加载进ConfigurableEnvironment中。
(4)、接下来为创建好的context上下文配置数据。其中就有把刚刚解析到的environment参数配置到context中,这样就把配置文件中的数据也设置到context中。具体代码如下:
private void prepareContext(ConfigurableApplicationContext context, ConfigurableEnvironment environment,
			SpringApplicationRunListeners listeners, ApplicationArguments applicationArguments, Banner printedBanner) {
	context.setEnvironment(environment);
	postProcessApplicationContext(context);
	applyInitializers(context);
	listeners.contextPrepared(context);
	if (this.logStartupInfo) {
		logStartupInfo(context.getParent() == null);
		logStartupProfileInfo(context);
	}
	// Add boot specific singleton beans
	ConfigurableListableBeanFactory beanFactory = context.getBeanFactory();
	beanFactory.registerSingleton("springApplicationArguments", applicationArguments);
	if (printedBanner != null) {
		beanFactory.registerSingleton("springBootBanner", printedBanner);
	}
	if (beanFactory instanceof DefaultListableBeanFactory) {
		((DefaultListableBeanFactory) beanFactory)
					.setAllowBeanDefinitionOverriding(this.allowBeanDefinitionOverriding);
	}
	if (this.lazyInitialization) {
		context.addBeanFactoryPostProcessor(new LazyInitializationBeanFactoryPostProcessor());
	}
	// Load the sources
	Set<Object> sources = getAllSources();
	Assert.notEmpty(sources, "Sources must not be empty");
	load(context, sources.toArray(new Object[0]));
	listeners.contextLoaded(context);
}
(5)、接下来会执行刷新上下文操作,该操作会执行Spring容器的全部实例加载。
@Override
public void refresh() throws BeansException, IllegalStateException {
	synchronized (this.startupShutdownMonitor) {
		// Prepare this context for refreshing.
		prepareRefresh();

		// Tell the subclass to refresh the internal bean factory.
		ConfigurableListableBeanFactory beanFactory = obtainFreshBeanFactory();

		// Prepare the bean factory for use in this context.
		prepareBeanFactory(beanFactory);

		try {
			// Allows post-processing of the bean factory in context subclasses.
			postProcessBeanFactory(beanFactory);

			// Invoke factory processors registered as beans in the context.
			invokeBeanFactoryPostProcessors(beanFactory);

			// Register bean processors that intercept bean creation.
			registerBeanPostProcessors(beanFactory);

			// Initialize message source for this context.
			initMessageSource();

			// Initialize event multicaster for this context.
			initApplicationEventMulticaster();

			// Initialize other special beans in specific context subclasses.
			onRefresh();

			// Check for listener beans and register them.
			registerListeners();

			// Instantiate all remaining (non-lazy-init) singletons.
			finishBeanFactoryInitialization(beanFactory);

			// Last step: publish corresponding event.
			finishRefresh();
		}

		catch (BeansException ex) {
			if (logger.isWarnEnabled()) {
					logger.warn("Exception encountered during context initialization - " +
							"cancelling refresh attempt: " + ex);
			}

			// Destroy already created singletons to avoid dangling resources.
			destroyBeans();

			// Reset 'active' flag.
			cancelRefresh(ex);

			// Propagate exception to caller.
			throw ex;
		}

		finally {
			// Reset common introspection caches in Spring's core, since we
			// might not ever need metadata for singleton beans anymore...
			resetCommonCaches();
		}
	}
}
具体的onRefresh操作是在ServletWebServerApplicationContext中执行的:
@Override
protected void onRefresh() {
	super.onRefresh();
	try {
		createWebServer();
	}
	catch (Throwable ex) {
		throw new ApplicationContextException("Unable to start web server", ex);
	}
}
这里会创建Web容器的实例。
private volatile WebServer webServer;
注意这里仅仅是创建容器的实例,还未发生启动操作。DispatcherServlet实例也不是在此处设置的。这里只是把设置DispatcherServlet的逻辑配置进去了,还不会执行。
设置DispatcherServlet到ServletContext中的代码如下:
private void selfInitialize(ServletContext servletContext) throws ServletException {
	prepareWebApplicationContext(servletContext);
	registerApplicationScope(servletContext);
	WebApplicationContextUtils.registerEnvironmentBeans(getBeanFactory(), servletContext);
	for (ServletContextInitializer beans : getServletContextInitializerBeans()) {
		beans.onStartup(servletContext);
	}
}

@Override
public final void onStartup(ServletContext servletContext) throws ServletException {
	String description = getDescription();
	if (!isEnabled()) {
		logger.info(StringUtils.capitalize(description) + " was not registered (disabled)");
		return;
	}
	register(description, servletContext);
}

@Override
protected final void register(String description, ServletContext servletContext) {
	D registration = addRegistration(description, servletContext);
	if (registration == null) {
		logger.info(StringUtils.capitalize(description) + " was not registered (possibly already registered?)");
		return;
	}
	configure(registration);
}

@Override
protected ServletRegistration.Dynamic addRegistration(String description, ServletContext servletContext) {
	String name = getServletName();
	return servletContext.addServlet(name, this.servlet);
}

@Override
protected void configure(ServletRegistration.Dynamic registration) {
	super.configure(registration);
	String[] urlMapping = StringUtils.toStringArray(this.urlMappings);
	if (urlMapping.length == 0 && this.alwaysMapUrl) {
		urlMapping = DEFAULT_MAPPINGS;
	}
	if (!ObjectUtils.isEmpty(urlMapping)) {
		registration.addMapping(urlMapping);
	}
	registration.setLoadOnStartup(this.loadOnStartup);
	if (this.multipartConfig != null) {
		registration.setMultipartConfig(this.multipartConfig);
	}
}

@Override
public Set<String> addMapping(String... urlPatterns) {
        if (urlPatterns == null) {
            return Collections.emptySet();
        }

        Set<String> conflicts = new HashSet<>();

        for (String urlPattern : urlPatterns) {
            String wrapperName = context.findServletMapping(urlPattern);
            if (wrapperName != null) {
                Wrapper wrapper = (Wrapper) context.findChild(wrapperName);
                if (wrapper.isOverridable()) {
                    // Some Wrappers (from global and host web.xml) may be
                    // overridden rather than generating a conflict
                    context.removeServletMapping(urlPattern);
                } else {
                    conflicts.add(urlPattern);
                }
            }
        }

        if (!conflicts.isEmpty()) {
            return conflicts;
        }

        for (String urlPattern : urlPatterns) {
            context.addServletMappingDecoded(
                    UDecoder.URLDecode(urlPattern, StandardCharsets.UTF_8), wrapper.getName());
        }

        if (constraint != null) {
            context.addServletSecurity(this, constraint);
        }

        return Collections.emptySet();
    }
这里可以看到,在这个类中ServletRegistrationBean分别将DispatcherServlet和URLMapping设置到ServletContext中。这部分触发逻辑是依赖Tomcat在启动的时候执行。
在执行完onRefresh之后,在finishRefresh()中执行web容器启动。
至此,Spring容器和web容器已经全部启动起来,至于Spring的context是如何跟Web容器关联起来,在SpringMVC的原理中讲述。
下面讲下,Web容器的配置是如何搭建起来的:
首先是ServletWebServer工厂的注册与初始化:
ServletWebServerFactory接口的实现类有三个可实例化的类。
TomcatServletWebServerFactory,
JettyServletWebServerFactory,
UndertowServletWebServerFactory。
默认的实现的是Tomcat。
创建及初始化ServerFactory的流程图如下:
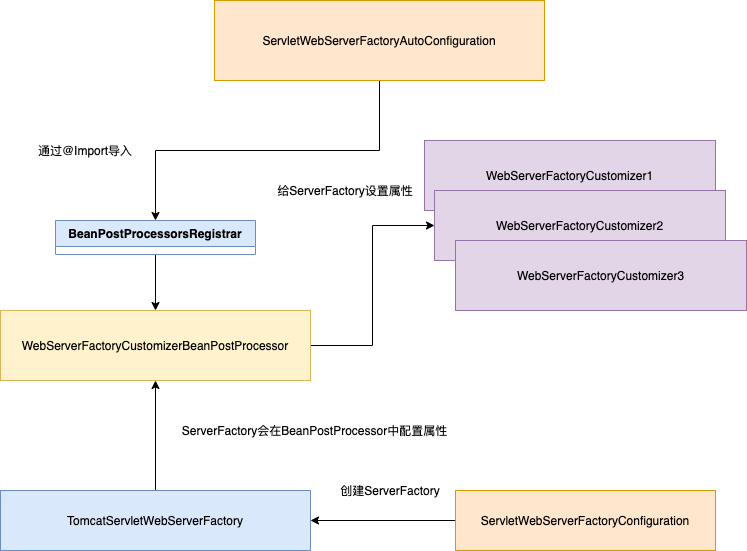
其中ServletWebServerFactoryAutoConfiguration这个类是创建WebServerFactoryCustomizer,这个类下面会介绍,并通过@Import导入BeanPostProcessorsRegistrar,这个类会在Spring容器初始化的时候获取并执行WebServerFactoryCustomizer的customize方法。
ServletWebServerFactoryConfiguration这个类是创建TomcatServletWebServerFactory。
WebServerFactoryCustomizer这个类是执行设置WebServerFactory的属性的方法。
类结构如下:
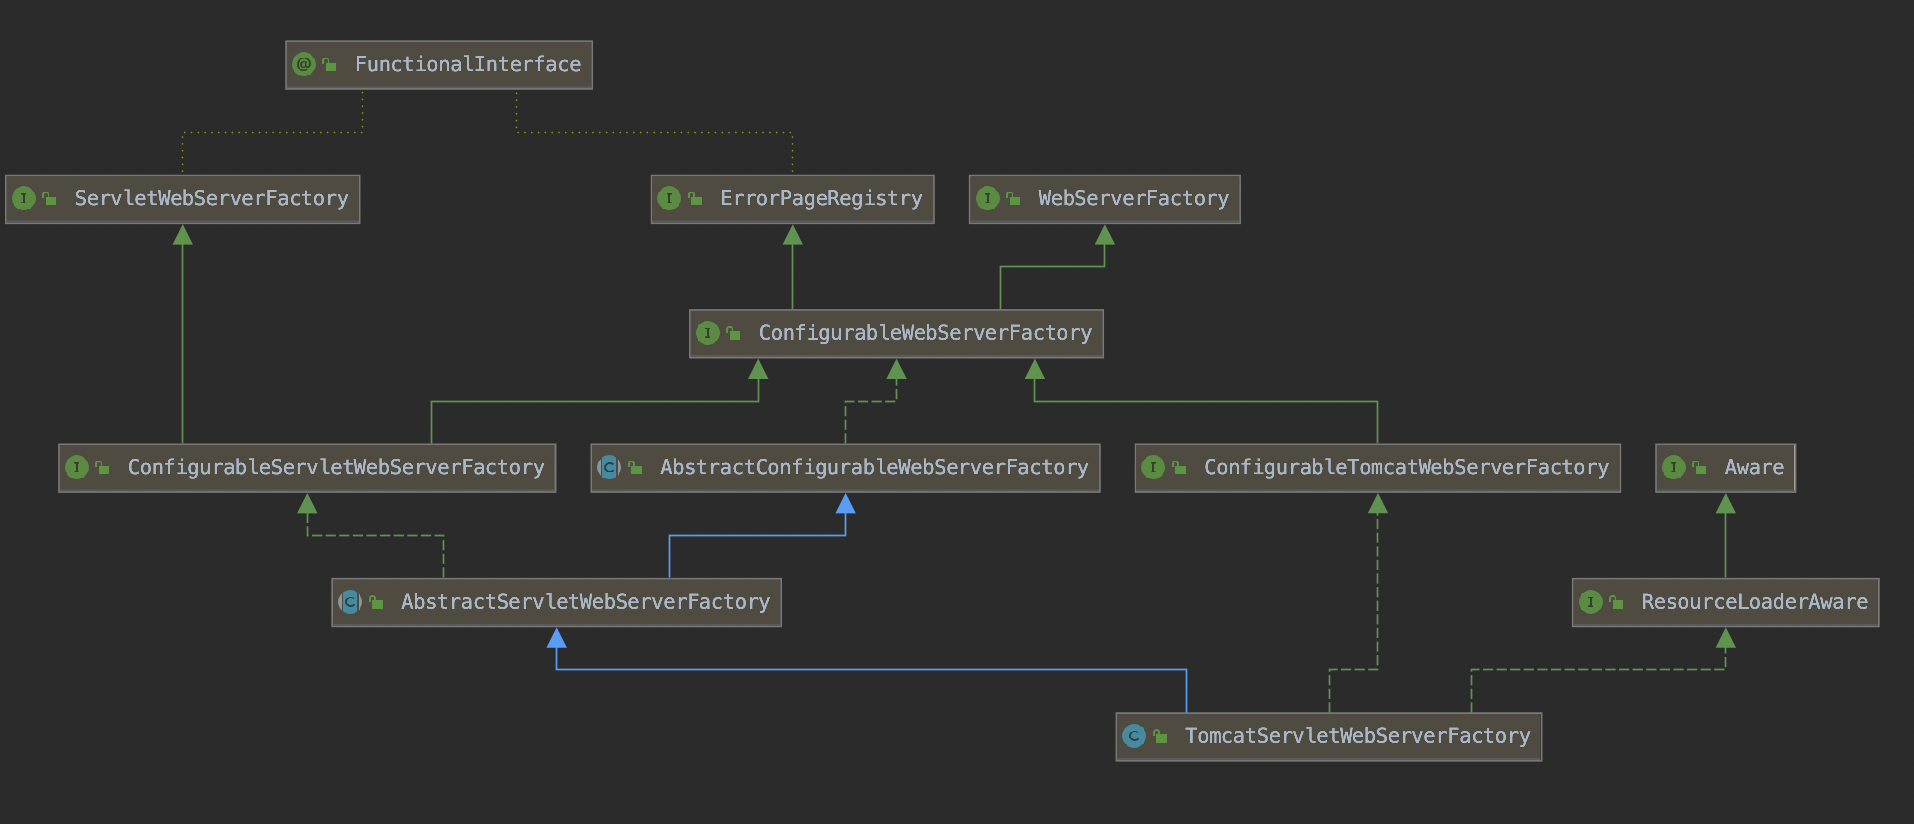
以上就是Tomcat服务被配置和创建的过程。
DispatcherServlet的创建与注册
首先DispatcherServlet是通过DispatcherServletAutoConfiguration类里面的DispatcherServletConfiguration的类创建DispatcherServlet实例,然后通过上面介绍启动容器的逻辑中将DispatcherServlet注册到容器中。