
1、SpringMVC中的组件介绍
上面提到DispatcherServlet在初始化的时候创建了九个组件,这九个组件用来支撑SpringMVC运行时的各项功能。分别如下:
(1)、MultipartResolver:分块请求解析器。
(2)、LocaleResolver:本地化解析器。
(3)、ThemeResolver:主题解析器。
(4)、HandlerMapping:映射处理器。
(5)、HandlerAdapter:处理器适配器。
(6)、HandlerExceptionResolver:异常处理器。
(7)、RequestToViewNameTranslator:请求视图转换器。
(8)、ViewResolver:视图解析器。
(9)、FlashMapManager:请求属性缓存器。
下面是在DispatcherServlet初始化中创建以上组件的代码:
protected void initStrategies(ApplicationContext context) {
	initMultipartResolver(context);
	initLocaleResolver(context);
	initThemeResolver(context);
	initHandlerMappings(context);
	initHandlerAdapters(context);
	initHandlerExceptionResolvers(context);
	initRequestToViewNameTranslator(context);
	initViewResolvers(context);
	initFlashMapManager(context);
}
2、SpringMVC中各个组件的初始化
(1)、MultipartResolver初始化:
MultipartResolver的初始化操作是在MultipartAutoConfiguration中执行的。
@Bean(name = DispatcherServlet.MULTIPART_RESOLVER_BEAN_NAME)
@ConditionalOnMissingBean(MultipartResolver.class)
public StandardServletMultipartResolver multipartResolver() {
	StandardServletMultipartResolver multipartResolver = new StandardServletMultipartResolver();
	multipartResolver.setResolveLazily(this.multipartProperties.isResolveLazily());
	return multipartResolver;
}
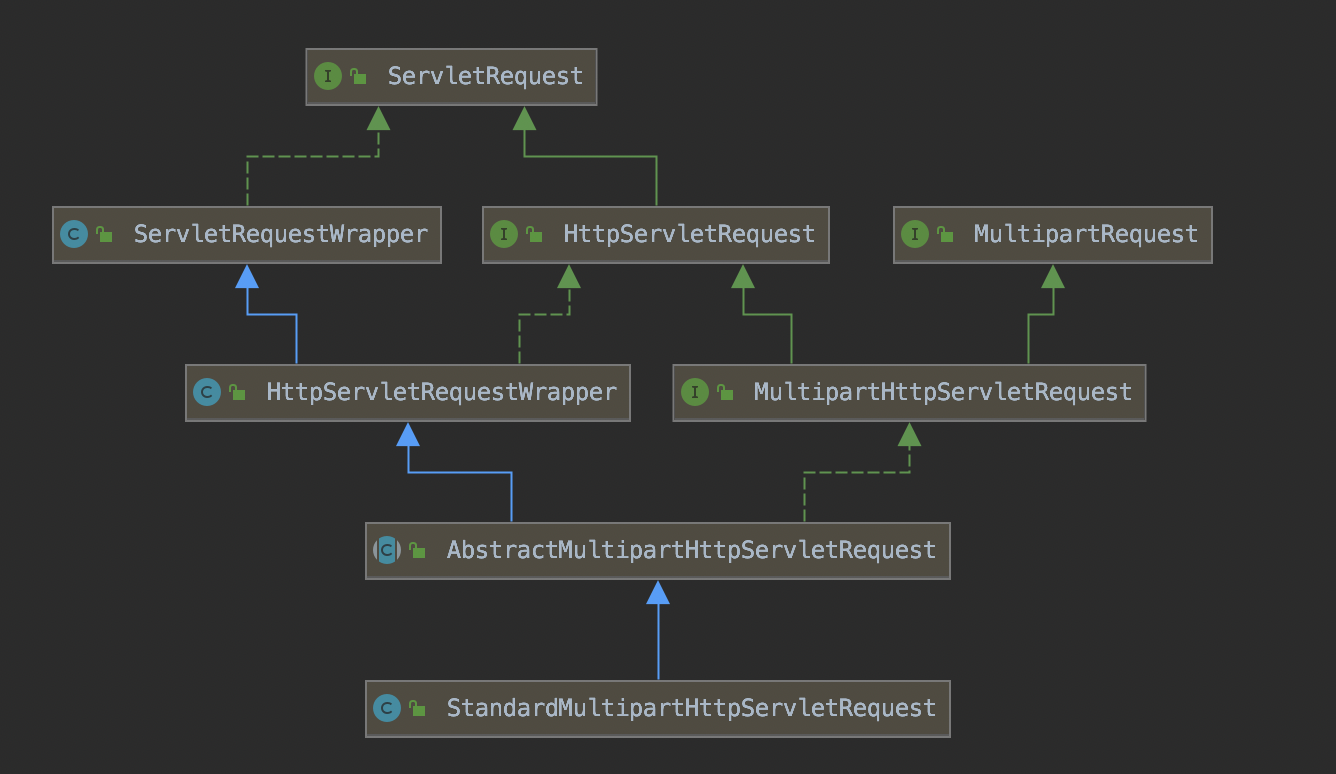
这里使用的是MultipartResolver实现类StandardServletMultipartResolver,这个类和实际操作是对HttpServletRequest进行增强(实现了MultipartRequest)StandardMultipartHttpServletRequest,类结构如下
具体初始化操作是:
private void initMultipartResolver(ApplicationContext context) {
	try {
		this.multipartResolver = context.getBean(MULTIPART_RESOLVER_BEAN_NAME, MultipartResolver.class);
		if (logger.isTraceEnabled()) {
			logger.trace("Detected " + this.multipartResolver);
		}
		else if (logger.isDebugEnabled()) {
			logger.debug("Detected " + this.multipartResolver.getClass().getSimpleName());
		}
	}
	catch (NoSuchBeanDefinitionException ex) {
	// Default is no multipart resolver.
	this.multipartResolver = null;
	if (logger.isTraceEnabled()) {
			logger.trace("No MultipartResolver '" + MULTIPART_RESOLVER_BEAN_NAME + "' declared");
		}
	}
}
这里的操作就是从容器中取出MultipartResolver对象。
(2)、LocaleResolver初始化
这个类是在WebMvcAutoConfiguration中被创建的。
@Bean
@ConditionalOnMissingBean
@ConditionalOnProperty(prefix = "spring.mvc", name = "locale")
public LocaleResolver localeResolver() {
	if (this.mvcProperties.getLocaleResolver() == WebMvcProperties.LocaleResolver.FIXED) {
		return new FixedLocaleResolver(this.mvcProperties.getLocale());
	}
	AcceptHeaderLocaleResolver localeResolver = new AcceptHeaderLocaleResolver();
	localeResolver.setDefaultLocale(this.mvcProperties.getLocale());
	return localeResolver;
}
具体的初始化操作initLocaleResolver跟上面的一致,也是从容器中获取bean。
(3)、ThemeResolver初始化
代码如下:
private void initThemeResolver(ApplicationContext context) {
	try {
		this.themeResolver = context.getBean(THEME_RESOLVER_BEAN_NAME, ThemeResolver.class);
		if (logger.isTraceEnabled()) {
			logger.trace("Detected " + this.themeResolver);
		}
		else if (logger.isDebugEnabled()) {
			logger.debug("Detected " + this.themeResolver.getClass().getSimpleName());
		}
	}
	catch (NoSuchBeanDefinitionException ex) {
		// We need to use the default.
		this.themeResolver = getDefaultStrategy(context, ThemeResolver.class);
		if (logger.isTraceEnabled()) {
			logger.trace("No ThemeResolver '" + THEME_RESOLVER_BEAN_NAME +
						"': using default [" + this.themeResolver.getClass().getSimpleName() + "]");
		}
	}
}
这里首先从Web容器中获取ThemeResolver,因为没有提前注册,所以此处不会获取到。那么会继续通过getDefaultStrategy方法从默认的配置文件中获取类名,并创建对象存到容器中。
具体代码如下:
protected <T> T getDefaultStrategy(ApplicationContext context, Class<T> strategyInterface) {
	List<T> strategies = getDefaultStrategies(context, strategyInterface);
	if (strategies.size() != 1) {
		throw new BeanInitializationException(
					"DispatcherServlet needs exactly 1 strategy for interface [" + strategyInterface.getName() + "]");
	}
	return strategies.get(0);
}

protected <T> List<T> getDefaultStrategies(ApplicationContext context, Class<T> strategyInterface) {
	String key = strategyInterface.getName();
	String value = defaultStrategies.getProperty(key);
	if (value != null) {
		String[] classNames = StringUtils.commaDelimitedListToStringArray(value);
		List<T> strategies = new ArrayList<>(classNames.length);
		for (String className : classNames) {
			try {
				Class<?> clazz = ClassUtils.forName(className, DispatcherServlet.class.getClassLoader());
				Object strategy = createDefaultStrategy(context, clazz);
				strategies.add((T) strategy);
			}
			catch (ClassNotFoundException ex) {
				throw new BeanInitializationException(
							"Could not find DispatcherServlet's default strategy class [" + className +
							"] for interface [" + key + "]", ex);
			}
			catch (LinkageError err) {
				throw new BeanInitializationException(
							"Unresolvable class definition for DispatcherServlet's default strategy class [" +
							className + "] for interface [" + key + "]", err);
			}
		}
		return strategies;
	}
	else {
		return new LinkedList<>();
	}
}
上面的方法首先会从一个defaultStrategies中获取类名。
defaultStrategies的创建过程如下:
private static final Properties defaultStrategies;

static {
	// Load default strategy implementations from properties file.
	// This is currently strictly internal and not meant to be customized
	// by application developers.
	try {
		ClassPathResource resource = new ClassPathResource(DEFAULT_STRATEGIES_PATH, DispatcherServlet.class);
		defaultStrategies = PropertiesLoaderUtils.loadProperties(resource);
	}
	catch (IOException ex) {
		throw new IllegalStateException("Could not load '" + DEFAULT_STRATEGIES_PATH + "': " + ex.getMessage());
	}
}
而这里面的DEFAULT_STRATEGIES_PATH就是DispatcherServlet.properties。
也就是说会从这个文件里面获取指定类型的实现类。
(4)、HandlerMapping初始化
private void initHandlerMappings(ApplicationContext context) {
	this.handlerMappings = null;

	if (this.detectAllHandlerMappings) {
		// Find all HandlerMappings in the ApplicationContext, including ancestor contexts.
		Map<String, HandlerMapping> matchingBeans =
					BeanFactoryUtils.beansOfTypeIncludingAncestors(context, HandlerMapping.class, true, false);
		if (!matchingBeans.isEmpty()) {
			this.handlerMappings = new ArrayList<>(matchingBeans.values());
			// We keep HandlerMappings in sorted order.
				AnnotationAwareOrderComparator.sort(this.handlerMappings);
		}
	}
	else {
		try {
			HandlerMapping hm = context.getBean(HANDLER_MAPPING_BEAN_NAME, HandlerMapping.class);
			this.handlerMappings = Collections.singletonList(hm);
		}
		catch (NoSuchBeanDefinitionException ex) {
			// Ignore, we'll add a default HandlerMapping later.
		}
	}

	// Ensure we have at least one HandlerMapping, by registering
	// a default HandlerMapping if no other mappings are found.
	if (this.handlerMappings == null) {
		this.handlerMappings = getDefaultStrategies(context, HandlerMapping.class);
		if (logger.isTraceEnabled()) {
			logger.trace("No HandlerMappings declared for servlet '" + getServletName() +
						"': using default strategies from DispatcherServlet.properties");
		}
	}
}
配置文件中默认配置了这三种实现类:
org.springframework.web.servlet.handler.BeanNameUrlHandlerMapping
org.springframework.web.servlet.mvc.method.annotation.RequestMappingHandlerMapping org.springframework.web.servlet.function.support.RouterFunctionMapping
(5)、HandlerAdapter初始化
代码与HandlerMapping初始化代码一样。
配置文件中默认配置了这四种实现类:
org.springframework.web.servlet.mvc.HttpRequestHandlerAdapter
org.springframework.web.servlet.mvc.SimpleControllerHandlerAdapter
org.springframework.web.servlet.mvc.method.annotation.RequestMappingHandlerAdapter
org.springframework.web.servlet.function.support.HandlerFunctionAdapter
(6)、HandlerExceptionResolver初始化
代码同上。
配置文件中配置了三种实现类:
org.springframework.web.servlet.mvc.method.annotation.ExceptionHandlerExceptionResolver
org.springframework.web.servlet.mvc.annotation.ResponseStatusExceptionResolver
org.springframework.web.servlet.mvc.support.DefaultHandlerExceptionResolver
(7)、RequestToViewNameTranslator初始化
代码同上。
配置文件中配置了一种实现类:
org.springframework.web.servlet.view.DefaultRequestToViewNameTranslator
(8)、ViewResolver初始化
代码同上。
配置文件中配置了一种实现类:
org.springframework.web.servlet.view.InternalResourceViewResolver
(9)、FlashMapManager初始化
代码同上。
配置文件中配置了一种实现类:
org.springframework.web.servlet.support.SessionFlashMapManager
3、SpringMVC中各个组件的源码分析
(1)、MultipartResolver组件:
默认使用StandardServletMultipartResolver
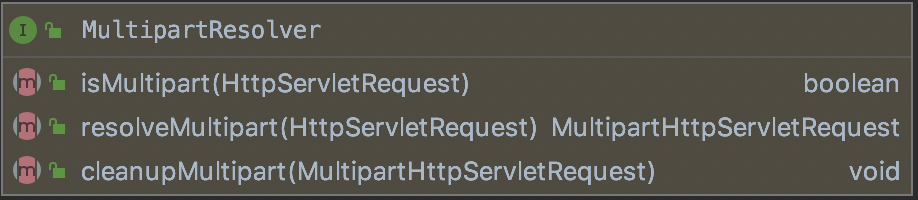
MutipartResolve组件中定义了三个方法:
isMultipart方法:该方法用于判断一个请求是否是分块请求,主要的原理是获取请求头中的ContentType是否是以multipart/开头。
resolveMultipart方法:该方法用于解析一个Request并把该请求封装成MultipartHttpServletRequest。
@Override
public MultipartHttpServletRequest resolveMultipart(HttpServletRequest request) throws MultipartException {
	return new StandardMultipartHttpServletRequest(request, this.resolveLazily);
}
在StandardServletMultipartResolver中是直接创建StandardMultipartHttpServletRequest。
public StandardMultipartHttpServletRequest(HttpServletRequest request, boolean lazyParsing)
			throws MultipartException {

	super(request);
	if (!lazyParsing) {
		parseRequest(request);
	}
}
在StandardMultipartHttpServletRequest构造函数中首先会判断是否需要懒加载,该信息是在MultipartAutoConfiguration通过读取配置文件中的spring.servlet.multipart.resolveLazily数据得到的。如果不是懒加载,那么会执行parseRequest方法。代码如下:
private void parseRequest(HttpServletRequest request) {
	try {
		Collection<Part> parts = request.getParts();
		this.multipartParameterNames = new LinkedHashSet<>(parts.size());
		MultiValueMap<String, MultipartFile> files = new LinkedMultiValueMap<>(parts.size());
		for (Part part : parts) {
			String headerValue = part.getHeader(HttpHeaders.CONTENT_DISPOSITION);
			ContentDisposition disposition = ContentDisposition.parse(headerValue);
			String filename = disposition.getFilename();
			if (filename != null) {
				if (filename.startsWith("=?") && filename.endsWith("?=")) {
					filename = MimeDelegate.decode(filename);
				}
				files.add(part.getName(), new StandardMultipartFile(part, filename));
			}
			else {
				this.multipartParameterNames.add(part.getName());
			}
		}
		setMultipartFiles(files);
	}
	catch (Throwable ex) {
		handleParseFailure(ex);
	}
}
parseRequest() 方法利用了 servlet3.0 的 request.getParts() 方法获取上传文件,并将其封装到 MultipartFile 对象中。
Part这个类的介绍如下:
/**
 * This class represents a part as uploaded to the server as part of a
 * <code>multipart/form-data</code> request body. The part may represent either
 * an uploaded file or form data.
 *
 * @since Servlet 3.0
 */
public interface Part {

    /**
     * Obtain an <code>InputStream</code> that can be used to retrieve the
     * contents of the file.
     *
     * @return An InputStream for the contents of the file
     *
     * @throws IOException if an I/O occurs while obtaining the stream
     */
    public InputStream getInputStream() throws IOException;

    /**
     * Obtain the content type passed by the browser.
     *
     * @return The content type passed by the browser or <code>null</code> if
     *         not defined.
     */
    public String getContentType();

    /**
     * Obtain the name of the field in the multipart form corresponding to this
     * part.
     *
     * @return The name of the field in the multipart form corresponding to this
     *         part.
     */
    public String getName();

    /**
     * If this part represents an uploaded file, gets the file name submitted
     * in the upload. Returns {@code null} if no file name is available or if
     * this part is not a file upload.
     *
     * @return the submitted file name or {@code null}.
     *
     * @since Servlet 3.1
     */
    public String getSubmittedFileName();

    /**
     * Obtain the size of this part.
     *
     * @return The size of the part if bytes
     */
    public long getSize();

    /**
     * A convenience method to write an uploaded part to disk. The client code
     * is not concerned with whether or not the part is stored in memory, or on
     * disk in a temporary location. They just want to write the uploaded part
     * to a file.
     *
     *  This method is not guaranteed to succeed if called more than once for
     *  the same part. This allows a particular implementation to use, for
     *  example, file renaming, where possible, rather than copying all of the
     *  underlying data, thus gaining a significant performance benefit.
     *
     * @param fileName  The location into which the uploaded part should be
     *                  stored. Relative locations are relative to {@link
     *                  javax.servlet.MultipartConfigElement#getLocation()}
     *
     * @throws IOException if an I/O occurs while attempting to write the part
     */
    public void write(String fileName) throws IOException;

    /**
     * Deletes the underlying storage for a part, including deleting any
     * associated temporary disk file. Although the container will delete this
     * storage automatically this method can be used to ensure that this is done
     * at an earlier time, thus preserving system resources.
     * <p>
     * Containers are only required to delete the associated storage when the
     * Part instance is garbage collected. Apache Tomcat will delete the
     * associated storage when the associated request has finished processing.
     * Behaviour of other containers may be different.
     *
     * @throws IOException if an I/O occurs while attempting to delete the part
     */
    public void delete() throws IOException;

    /**
     * Obtains the value of the specified part header as a String. If there are
     * multiple headers with the same name, this method returns the first header
     * in the part. The header name is case insensitive.
     *
     * @param name  Header name
     * @return      The header value or <code>null</code> if the header is not
     *              present
     */
    public String getHeader(String name);

    /**
     * Obtain all the values of the specified part header.
     * @param name The name of the header of interest. The header name is case
     *             insensitive.
     * @return All the values of the specified part header. If the part did not
     *         include any headers of the specified name, this method returns an
     *         empty Collection.
     */
    public Collection<String> getHeaders(String name);

    /**
     * Get the header names provided for this part.
     * @return a Collection of all the header names provided for this part.
     */
    public Collection<String> getHeaderNames();
}
可以通过Part这个类来获取文件名,文件大小,二进制文件数据等等。
cleanupMultipart方法:该方法主要是用于DispatcherServlet在处理完请求并响应之后,释放之前缓存的文件数据。
@Override
public void cleanupMultipart(MultipartHttpServletRequest request) {
	if (!(request instanceof AbstractMultipartHttpServletRequest) ||
				((AbstractMultipartHttpServletRequest) request).isResolved()) {
		// To be on the safe side: explicitly delete the parts,
		// but only actual file parts (for Resin compatibility)
		try {
			for (Part part : request.getParts()) {
				if (request.getFile(part.getName()) != null) {
					part.delete();
				}
			}
		}
		catch (Throwable ex) {
			LogFactory.getLog(getClass()).warn("Failed to perform cleanup of multipart items", ex);
		}
	}
}
另外在使用文件上传功能的时候文件的转存是通过MultipartFile的transferTo方法来实现的。
@Override
public void transferTo(File dest) throws IOException, IllegalStateException {
	this.part.write(dest.getPath());
	if (dest.isAbsolute() && !dest.exists()) {
		// Servlet 3.0 Part.write is not guaranteed to support absolute file paths:
		// may translate the given path to a relative location within a temp dir
		// (e.g. on Jetty whereas Tomcat and Undertow detect absolute paths).
		// At least we offloaded the file from memory storage; it'll get deleted
		// from the temp dir eventually in any case. And for our user's purposes,
		// we can manually copy it to the requested location as a fallback.
		FileCopyUtils.copy(this.part.getInputStream(),Files.newOutputStream(dest.toPath()));
	}
}
(2)、LocaleResolver解析器
作用是根据用户不同的区域选择不同的视图。
LocaleResolver接口的方法如下:

resolveLocale方法用于解析本次request的local。
setLocale方法用于切换本次request的local。
该接口主要有如下的实现类:
AcceptHeaderLocaleResolver:通过解析Header中的数据获取Locale
CookieLocaleResolver:通过解析Header中的数据获取Locale
FixedLocaleResolver:默认解析器
SessionLocaleResolver:通过解析Session中的数据获取Locale
首先来分析AcceptHeaderLocaleResolver的实现:
代码如下:
@Override
public Locale resolveLocale(HttpServletRequest request) {
	Locale defaultLocale = getDefaultLocale();
	if (defaultLocale != null && request.getHeader("Accept-Language") == null) {
		return defaultLocale;
	}
	Locale requestLocale = request.getLocale();
	List<Locale> supportedLocales = getSupportedLocales();
	if (supportedLocales.isEmpty() || supportedLocales.contains(requestLocale)) {
		return requestLocale;
	}
	Locale supportedLocale = findSupportedLocale(request, supportedLocales);
	if (supportedLocale != null) {
		return supportedLocale;
	}
	return (defaultLocale != null ? defaultLocale : requestLocale);
}
方法开始会判断请求中的Header是否含有Accept-Language如果为null,则直接使用默认的Local,默认的Local是从配置文件中读取并加载的。然后会从request中获取Local,并获取支持的Locals,如果Locals中存在那么就使用该Local。如果不支持,则继续判断是否存在支持用户本地语言的Local,如果存在则返回。
setLocale方法:AcceptHeaderLocaleResolver不支持变更Local
@Override
public void setLocale(HttpServletRequest request, @Nullable HttpServletResponse response, @Nullable Locale locale) {
	throw new UnsupportedOperationException(
				"Cannot change HTTP accept header - use a different locale resolution strategy");
}
接下来是CookieLocaleResolver:
@Override
public Locale resolveLocale(HttpServletRequest request) {
	parseLocaleCookieIfNecessary(request);
	return (Locale) request.getAttribute(LOCALE_REQUEST_ATTRIBUTE_NAME);
}
默认的Cookie的key是org.springframework.web.servlet.i18n.LOCALE
首先会尝试从request中回去key为上面的字符串的Cookie。然后生成localePart和timeZonePart,然后将这部分数据设置到requestAttribute中。
@Override
public void setLocale(HttpServletRequest request, @Nullable HttpServletResponse response, @Nullable Locale locale) {
	setLocaleContext(request, response, (locale != null ? new SimpleLocaleContext(locale) : null));
}

@Override
public void setLocaleContext(HttpServletRequest request, @Nullable HttpServletResponse response,
			@Nullable LocaleContext localeContext) {

	Assert.notNull(response, "HttpServletResponse is required for CookieLocaleResolver");

	Locale locale = null;
	TimeZone timeZone = null;
	if (localeContext != null) {
		locale = localeContext.getLocale();
		if (localeContext instanceof TimeZoneAwareLocaleContext) {
			timeZone = ((TimeZoneAwareLocaleContext) localeContext).getTimeZone();
		}
		addCookie(response,
					(locale != null ? toLocaleValue(locale) : "-") + (timeZone != null ? '/' + timeZone.getID() : ""));
	}
	else {
		removeCookie(response);
	}
	request.setAttribute(LOCALE_REQUEST_ATTRIBUTE_NAME,
				(locale != null ? locale : determineDefaultLocale(request)));
	request.setAttribute(TIME_ZONE_REQUEST_ATTRIBUTE_NAME,
				(timeZone != null ? timeZone : determineDefaultTimeZone(request)));
}
FixedLocaleResolver解析器会使用默认的Locale进行处理。
SessionLocaleResolver解析器与CookieLocaleResolve原理一致不再赘述。
(3)、ThemeResolver主题解析器
ThemeResolver接口的方法如下:

ThemeResolve解析器与LocalResolve解析器的实现原理是一致的。
(4)、HandlerMapping映射解析器
HandlerMapping的实现类有如下几个:
org.springframework.web.servlet.handler.BeanNameUrlHandlerMapping
org.springframework.web.servlet.mvc.method.annotation.RequestMappingHandlerMapping
org.springframework.web.servlet.function.support.RouterFunctionMapping
该接口的字段和方法如下所示:
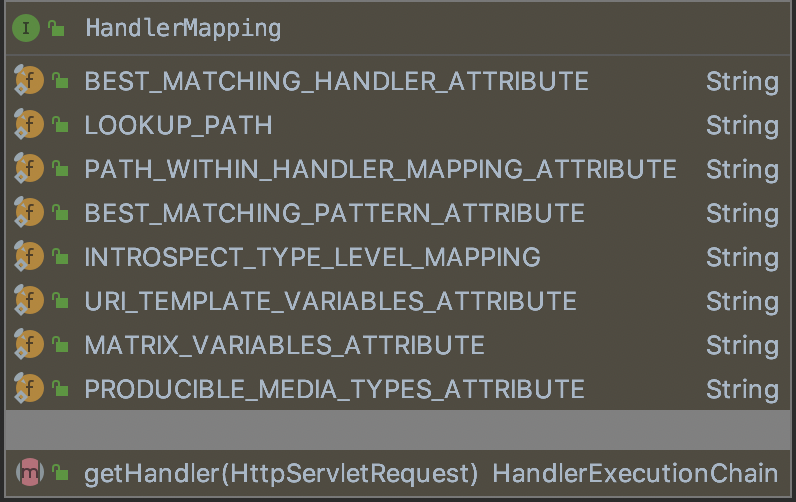
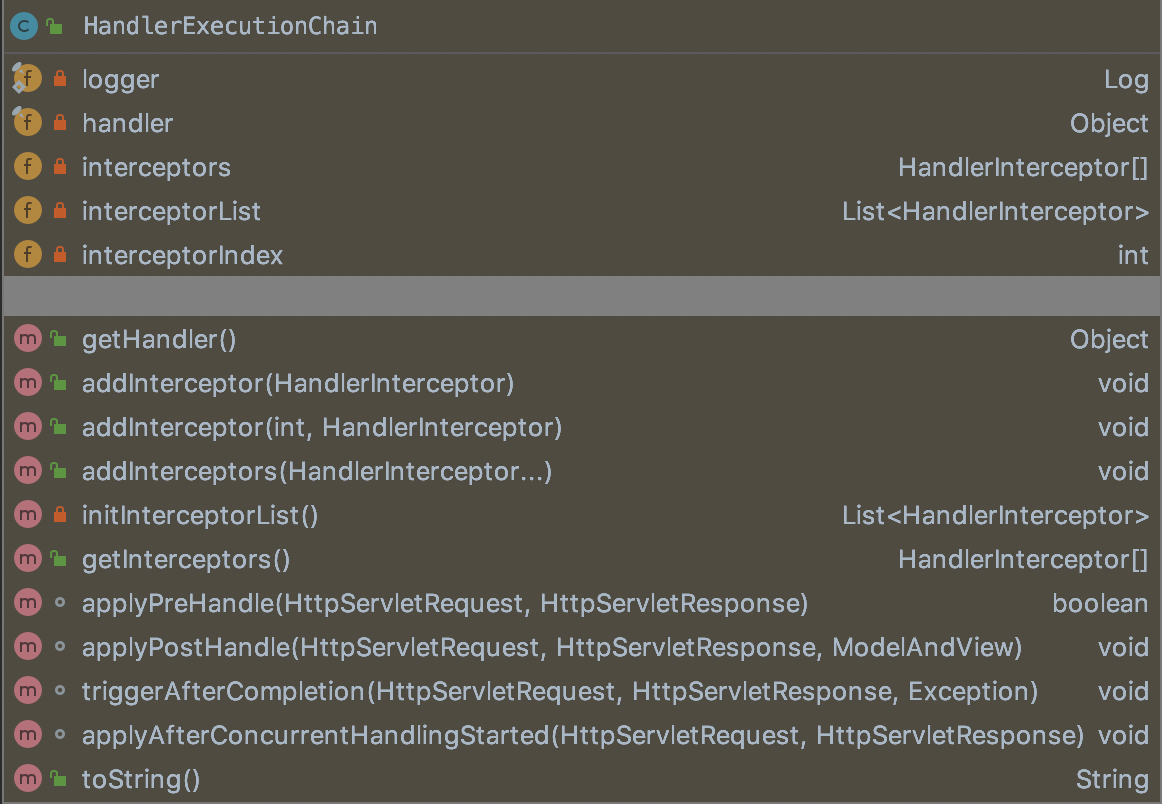
getHandler方法的返回值HandlerExecutionChain结构如下:
包含一个Handler和HandlerInterceptor拦截器列表。
下面分析下RequestMappingHandlerMapping的工作原理:
RequestMappingHandlerMapping类的结构如下:

该类实现了ApplicationContextAware用于获取context引用。实现ServletContextAware用于获取ServletContext引用。
(1)、RequestMappingHandlerMapping的初始化
RequestMappingHandlerMapping类实现了InitializingBean,那么在创建这个Bean的时候会在AbstractAutowireCapableBeanFactory的invokeInitMethods方法中凡是实现InitializingBean的方法都会调用afterPropertiesSet方法。
代码如下:
protected void invokeInitMethods(String beanName, final Object bean, @Nullable RootBeanDefinition mbd)
			throws Throwable {

	boolean isInitializingBean = (bean instanceof InitializingBean);
	if (isInitializingBean && (mbd == null || !mbd.isExternallyManagedInitMethod("afterPropertiesSet"))) {
		if (logger.isTraceEnabled()) {
			logger.trace("Invoking afterPropertiesSet() on bean with name '" + beanName + "'");
		}
		if (System.getSecurityManager() != null) {
			try {
				AccessController.doPrivileged((PrivilegedExceptionAction<Object>) () -> {
					((InitializingBean) bean).afterPropertiesSet();
					return null;
				}, getAccessControlContext());
			}
			catch (PrivilegedActionException pae) {
				throw pae.getException();
			}
		}
		else {
			((InitializingBean) bean).afterPropertiesSet();
		}
	}

	if (mbd != null && bean.getClass() != NullBean.class) {
		String initMethodName = mbd.getInitMethodName();
		if (StringUtils.hasLength(initMethodName) &&
					!(isInitializingBean && "afterPropertiesSet".equals(initMethodName)) &&
					!mbd.isExternallyManagedInitMethod(initMethodName)) {
			invokeCustomInitMethod(beanName, bean, mbd);
		}
	}
}
那么此时就会调用RequestMappingHandlerMapping的afterPropertiesSet方法。该方法会调用其父类的afterPropertiesSet方法。AbstractHandlerMethodMapping
代码如下:
@Override
public void afterPropertiesSet() {
	initHandlerMethods();
}

protected void initHandlerMethods() {
	for (String beanName : getCandidateBeanNames()) {
		if (!beanName.startsWith(SCOPED_TARGET_NAME_PREFIX)) {
			processCandidateBean(beanName);
		}
	}
	handlerMethodsInitialized(getHandlerMethods());
}
这个方法会首先从容器中取出所有的beanName进行遍历是否符合条件.
protected void processCandidateBean(String beanName) {
	Class<?> beanType = null;
		try {
		beanType = obtainApplicationContext().getType(beanName);
	}
	catch (Throwable ex) {
		// An unresolvable bean type, probably from a lazy bean - let's ignore it.
		if (logger.isTraceEnabled()) {
			logger.trace("Could not resolve type for bean '" + beanName + "'", ex);
		}
	}
	if (beanType != null && isHandler(beanType)) {
		detectHandlerMethods(beanName);
	}
}
首先会根据BeanName从容器中取出Class,然后这个判断逻辑是通过isHandler来执行的。
@Override
protected boolean isHandler(Class<?> beanType) {
	return (AnnotatedElementUtils.hasAnnotation(beanType, Controller.class) ||
			AnnotatedElementUtils.hasAnnotation(beanType, RequestMapping.class));
}
这里判断是否是一个Handler的条件是这个类型是否被Controller或Request Mapping注解标记。如果是那么会执行detectHandlerMethods。
protected void detectHandlerMethods(Object handler) {
	Class<?> handlerType = (handler instanceof String ?
				obtainApplicationContext().getType((String) handler) : handler.getClass());

	if (handlerType != null) {
		Class<?> userType = ClassUtils.getUserClass(handlerType);
		Map<Method, T> methods = MethodIntrospector.selectMethods(userType,
					(MethodIntrospector.MetadataLookup<T>) method -> {
					try {
						return getMappingForMethod(method, userType);
					}
					catch (Throwable ex) {
						throw new IllegalStateException("Invalid mapping on handler class [" +
									userType.getName() + "]: " + method, ex);
					}
				});
		if (logger.isTraceEnabled()) {
			logger.trace(formatMappings(userType, methods));
		}
		methods.forEach((method, mapping) -> {
			Method invocableMethod = AopUtils.selectInvocableMethod(method, userType);
			registerHandlerMethod(handler, invocableMethod, mapping);
		});
	}
}
这个方法的核心逻辑主要有两点:
第一会从Class中找到符合条件的方法。
第二会将对应的Handler注册到Map中,用于找到与请求最匹配的Hander。
这里MethodIntrospector主要的作用是根据开发者自定义的条件筛选出符合条件的Method和查询结果的Map,这里就是Method和RequestMappingInfo。条件的逻辑是依靠MetadataLookup这个函数接口来实现的。而这里的筛选条件代码如下:
Map<Method, T> methods = MethodIntrospector.selectMethods(userType,
					(MethodIntrospector.MetadataLookup<T>) method -> {
						try {
							return getMappingForMethod(method, userType);
						}
						catch (Throwable ex) {
							throw new IllegalStateException("Invalid mapping on handler class [" +
									userType.getName() + "]: " + method, ex);
						}
					});
实际上是依赖getMappingForMethod这个方法来实现的。这个方法在AbstractHandlerMethodMapping中是抽象的,在RequestMappingInfoHandlerMapping中进行了实现
@Override
@Nullable
protected RequestMappingInfo getMappingForMethod(Method method, Class<?> handlerType) {
	RequestMappingInfo info = createRequestMappingInfo(method);
	if (info != null) {
		RequestMappingInfo typeInfo = createRequestMappingInfo(handlerType);
		if (typeInfo != null) {
			info = typeInfo.combine(info);
		}
		String prefix = getPathPrefix(handlerType);
		if (prefix != null) {
			info = RequestMappingInfo.paths(prefix).options(this.config).build().combine(info);
		}
	}
	return info;
}
这个方法会根据Method创建一个RequestMappingInfo对象。如果该方法不存在RequestMapping的注解那么就会返回null。
如果RequestMappingInfo不为null,那么会将Method和RequestMappingInfo缓存起来放到Map中。然后注册到MappingRegistry中。
RequestMappingHandlerMapping初始化的原理图如下:
-f67b90ddb4ae498b9d2a3f002c7e2cbc.png)
在实现过程中,方法内通过函数接口和模版模式的方式实现了两个类之间的协同调用,值得学习。
PS:在查看源码的时候涉及到了桥接方法,桥接方法是 JDK 1.5 引入泛型后,为了使Java的泛型方法生成的字节码和 1.5 版本前的字节码相兼容,由编译器自动生成的方法。可以通过Method.isBridge()方法来判断一个方法是否是桥接方法,在字节码中桥接方法会被标记为ACC_BRIDGE和ACC_SYNTHETIC,其中ACC_BRIDGE用于说明这个方法是由编译生成的桥接方法,ACC_SYNTHETIC说明这个方法是由编译器生成,并且不会在源代码中出现。可以查看jvm规范中对这两个access_flag的解释。
(2)、RequestMappingHandlerMapping筛选合适的handler
筛选的逻辑是在AbstractHandlerMapping中实现的:
@Override
@Nullable
public final HandlerExecutionChain getHandler(HttpServletRequest request) throws Exception {
	Object handler = getHandlerInternal(request);
	if (handler == null) {
		handler = getDefaultHandler();
	}
	if (handler == null) {
		return null;
	}
	// Bean name or resolved handler?
	if (handler instanceof String) {
		String handlerName = (String) handler;
		handler = obtainApplicationContext().getBean(handlerName);
	}

	HandlerExecutionChain executionChain = getHandlerExecutionChain(handler, request);

	if (logger.isTraceEnabled()) {
		logger.trace("Mapped to " + handler);
	}
	else if (logger.isDebugEnabled() && !request.getDispatcherType().equals(DispatcherType.ASYNC)) {
		logger.debug("Mapped to " + executionChain.getHandler());
	}

	if (hasCorsConfigurationSource(handler) || CorsUtils.isPreFlightRequest(request)) {
		CorsConfiguration config = (this.corsConfigurationSource != null ? this.corsConfigurationSource.getCorsConfiguration(request) : null);
		CorsConfiguration handlerConfig = getCorsConfiguration(handler, request);
		config = (config != null ? config.combine(handlerConfig) : handlerConfig);
		executionChain = getCorsHandlerExecutionChain(request, executionChain, config);
	}

	return executionChain;
}
其中筛选处理器的逻辑是在getHandlerInternal中实现的。
@Override
protected HandlerMethod getHandlerInternal(HttpServletRequest request) throws Exception {
	String lookupPath = getUrlPathHelper().getLookupPathForRequest(request);
	request.setAttribute(LOOKUP_PATH, lookupPath);
	this.mappingRegistry.acquireReadLock();
	try {
		HandlerMethod handlerMethod = lookupHandlerMethod(lookupPath, request);
		return (handlerMethod != null ? handlerMethod.createWithResolvedBean() : null);
	}
	finally {
		this.mappingRegistry.releaseReadLock();
	}
}
首先会通过request获取Path路径,然后根据路径名和request来获取HandlerMethod。这里的核心逻辑主要是在lookupHandlerMethod中完成的。
@Nullable
protected HandlerMethod lookupHandlerMethod(String lookupPath, HttpServletRequest request) throws Exception {
	List<Match> matches = new ArrayList<>();
	List<T> directPathMatches = this.mappingRegistry.getMappingsByUrl(lookupPath);
	if (directPathMatches != null) {
		addMatchingMappings(directPathMatches, matches, request);
	}
	if (matches.isEmpty()) {
		// No choice but to go through all mappings...
		addMatchingMappings(this.mappingRegistry.getMappings().keySet(), matches, request);
	}

	if (!matches.isEmpty()) {
		Comparator<Match> comparator = new MatchComparator(getMappingComparator(request));
		matches.sort(comparator);
		Match bestMatch = matches.get(0);
		if (matches.size() > 1) {
			if (logger.isTraceEnabled()) {
				logger.trace(matches.size() + " matching mappings: " + matches);
			}
			if (CorsUtils.isPreFlightRequest(request)) {
				return PREFLIGHT_AMBIGUOUS_MATCH;
			}
			Match secondBestMatch = matches.get(1);
			if (comparator.compare(bestMatch, secondBestMatch) == 0) {
				Method m1 = bestMatch.handlerMethod.getMethod();
				Method m2 = secondBestMatch.handlerMethod.getMethod();
				String uri = request.getRequestURI();
				throw new IllegalStateException(
							"Ambiguous handler methods mapped for '" + uri + "': {" + m1 + ", " + m2 + "}");
			}
		}
		request.setAttribute(BEST_MATCHING_HANDLER_ATTRIBUTE, bestMatch.handlerMethod);
		handleMatch(bestMatch.mapping, lookupPath, request);
		return bestMatch.handlerMethod;
	}
	else {
		return handleNoMatch(this.mappingRegistry.getMappings().keySet(), lookupPath, request);
	}
}
方法中主要有两个核心逻辑,首先是获取本次请求符合的MethodHandlers,然后根据一系列规则进行排序最后从列表中取出最符合条件的MethodHandler。
首先是addMatchingMappings方法,该方法是获取符合条件的HandlerMethod。
private void addMatchingMappings(Collection<T> mappings, List<Match> matches, HttpServletRequest request) {
	for (T mapping : mappings) {
		T match = getMatchingMapping(mapping, request);
		if (match != null) {
			matches.add(new Match(match, this.mappingRegistry.getMappings().get(mapping)));
		}
	}
}

@Override
protected RequestMappingInfo getMatchingMapping(RequestMappingInfo info, HttpServletRequest request) {
	return info.getMatchingCondition(request);
}

@Override
@Nullable
public RequestMappingInfo getMatchingCondition(HttpServletRequest request) {
	RequestMethodsRequestCondition methods = this.methodsCondition.getMatchingCondition(request);
	if (methods == null) {
		return null;
	}
	ParamsRequestCondition params = this.paramsCondition.getMatchingCondition(request);
	if (params == null) {
		return null;
	}
	HeadersRequestCondition headers = this.headersCondition.getMatchingCondition(request);
	if (headers == null) {
		return null;
	}
	ConsumesRequestCondition consumes = this.consumesCondition.getMatchingCondition(request);
	if (consumes == null) {
		return null;
	}
	ProducesRequestCondition produces = this.producesCondition.getMatchingCondition(request);
	if (produces == null) {
		return null;
	}
	PatternsRequestCondition patterns = this.patternsCondition.getMatchingCondition(request);
	if (patterns == null) {
		return null;
	}
	RequestConditionHolder custom = this.customConditionHolder.getMatchingCondition(request);
	if (custom == null) {
		return null;
	}

	return new RequestMappingInfo(this.name, patterns,
				methods, params, headers, consumes, produces, custom.getCondition());
}
这里列举了所有的Condition,所有的Condition其实都实现了同一个接口并且都有一个公共的抽象类:
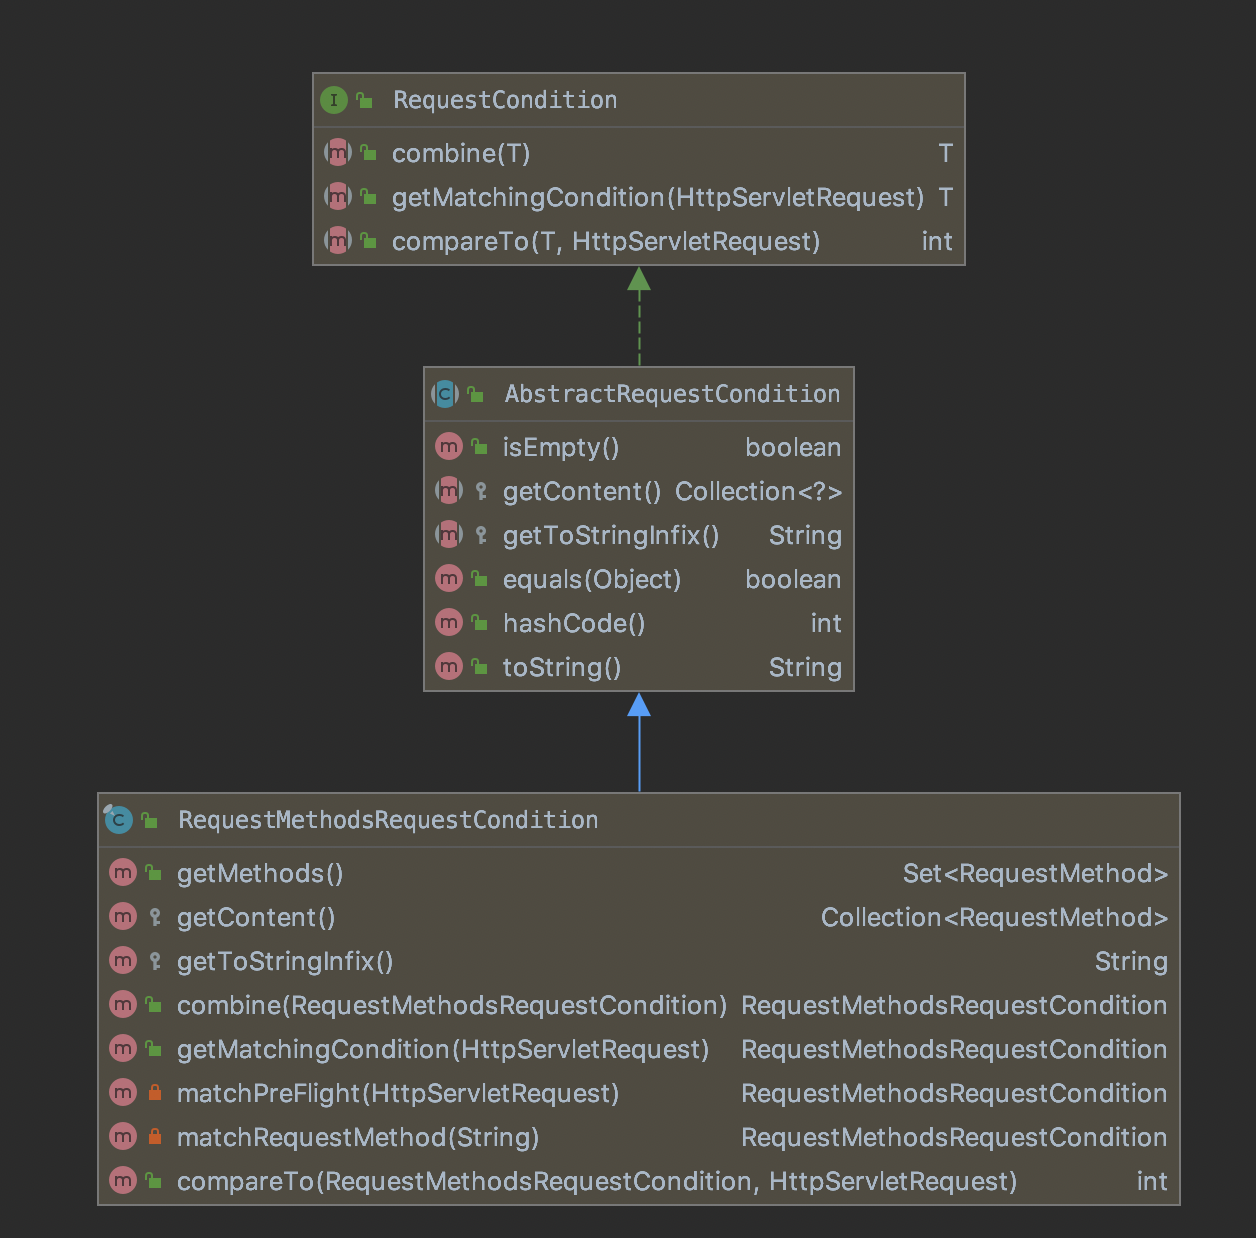
该接口的方法有下面三个:
combine:将相同的Condition合并到一起。
getMatchingCondition:根据request获取符合的Condition。
compareTo:两个Condition进行比较,用于排序。
根据上述,getMatchingCondition方法的逻辑是通过请求的各个参数来获取各个Condition用于当匹配到多个MethodHandler时,进行排序。
首先最开始创建的是RequestMethodsRequestCondition,这个类用于表示请求的方法条件,对应的是@RequestMapping的method数组的属性。这里RequestMethodsRequestCondition会缓存所有方法对应的RequestMethodsRequestCondition。并且在改对象被创建的时候会保存RequestMethod到Set中,共后续使用。
其他后续的Condition与比较算法会在后续的文章中详细描述。
上面的方法的核心逻辑其实就是根据提供的request与之前缓存的HandlerMapping进行比较,如果符合则创建RequestMappingInfo,否则就直接返回null,然后进行下一次匹配,如果匹配成功则创建List
(5)、HandlerAdapter处理适配器
HandlerAdapter的作用是根据提供的HandlerMapping进行适配,执行方法过后返回ModelAndView。此处主要使用的是适配器原理。此接口主要有以下几个方法:

该接口有以下几个实现类:
HttpRequestHandlerAdapter
RequestMappingHandlerAdapter
SimpleControllerHandlerAdapter
SimpleServletHandlerAdapter
以RequestMappingHandlerAdapter为例,该类的结构图如下:

RequestMappingHandlerAdapter也实现了InitializingBean,所以当这个Bean被创建的时候该类的afterPropertiesSet方法,该方法代码如下:
@Override
public void afterPropertiesSet() {
	// Do this first, it may add ResponseBody advice beans
	initControllerAdviceCache();

	if (this.argumentResolvers == null) {
		List<HandlerMethodArgumentResolver> resolvers = getDefaultArgumentResolvers();
		this.argumentResolvers = new HandlerMethodArgumentResolverComposite().addResolvers(resolvers);
	}
	if (this.initBinderArgumentResolvers == null) {
		List<HandlerMethodArgumentResolver> resolvers = getDefaultInitBinderArgumentResolvers();
		this.initBinderArgumentResolvers = new HandlerMethodArgumentResolverComposite().addResolvers(resolvers);
	}
	if (this.returnValueHandlers == null) {
		List<HandlerMethodReturnValueHandler> handlers = getDefaultReturnValueHandlers();
		this.returnValueHandlers = new HandlerMethodReturnValueHandlerComposite().addHandlers(handlers);
	}
}
首先该方法会初始化参数解析器,代码如下:
private List<HandlerMethodArgumentResolver> getDefaultArgumentResolvers() {
	List<HandlerMethodArgumentResolver> resolvers = new ArrayList<>();

	// Annotation-based argument resolution
	resolvers.add(new RequestParamMethodArgumentResolver(getBeanFactory(), false));
	resolvers.add(new RequestParamMapMethodArgumentResolver());
	resolvers.add(new PathVariableMethodArgumentResolver());
	resolvers.add(new PathVariableMapMethodArgumentResolver());
	resolvers.add(new MatrixVariableMethodArgumentResolver());
	resolvers.add(new MatrixVariableMapMethodArgumentResolver());
	resolvers.add(new ServletModelAttributeMethodProcessor(false));
	resolvers.add(new RequestResponseBodyMethodProcessor(getMessageConverters(), this.requestResponseBodyAdvice));
	resolvers.add(new RequestPartMethodArgumentResolver(getMessageConverters(), this.requestResponseBodyAdvice));
	resolvers.add(new RequestHeaderMethodArgumentResolver(getBeanFactory()));
	resolvers.add(new RequestHeaderMapMethodArgumentResolver());
	resolvers.add(new ServletCookieValueMethodArgumentResolver(getBeanFactory()));
	resolvers.add(new ExpressionValueMethodArgumentResolver(getBeanFactory()));
	resolvers.add(new SessionAttributeMethodArgumentResolver());
	resolvers.add(new RequestAttributeMethodArgumentResolver());

	// Type-based argument resolution
	resolvers.add(new ServletRequestMethodArgumentResolver());
	resolvers.add(new ServletResponseMethodArgumentResolver());
	resolvers.add(new HttpEntityMethodProcessor(getMessageConverters(), this.requestResponseBodyAdvice));
	resolvers.add(new RedirectAttributesMethodArgumentResolver());
	resolvers.add(new ModelMethodProcessor());
	resolvers.add(new MapMethodProcessor());
	resolvers.add(new ErrorsMethodArgumentResolver());
	resolvers.add(new SessionStatusMethodArgumentResolver());
	resolvers.add(new UriComponentsBuilderMethodArgumentResolver());

	// Custom arguments
	if (getCustomArgumentResolvers() != null) {
		resolvers.addAll(getCustomArgumentResolvers());
	}

	// Catch-all
	resolvers.add(new RequestParamMethodArgumentResolver(getBeanFactory(), true));
	resolvers.add(new ServletModelAttributeMethodProcessor(true));

	return resolvers;
}
该方法中会默认初始化一系列方法参数解析器供后续使用。
接下来会初始化一系列参数绑定器,代码如下:
private List<HandlerMethodArgumentResolver> getDefaultInitBinderArgumentResolvers() {
	List<HandlerMethodArgumentResolver> resolvers = new ArrayList<>();

	// Annotation-based argument resolution
	resolvers.add(new RequestParamMethodArgumentResolver(getBeanFactory(), false));
	resolvers.add(new RequestParamMapMethodArgumentResolver());
	resolvers.add(new PathVariableMethodArgumentResolver());
	resolvers.add(new PathVariableMapMethodArgumentResolver());
	resolvers.add(new MatrixVariableMethodArgumentResolver());
	resolvers.add(new MatrixVariableMapMethodArgumentResolver());
	resolvers.add(new ExpressionValueMethodArgumentResolver(getBeanFactory()));
	resolvers.add(new SessionAttributeMethodArgumentResolver());
	resolvers.add(new RequestAttributeMethodArgumentResolver());

	// Type-based argument resolution
	resolvers.add(new ServletRequestMethodArgumentResolver());
	resolvers.add(new ServletResponseMethodArgumentResolver());

	// Custom arguments
	if (getCustomArgumentResolvers() != null) {
		resolvers.addAll(getCustomArgumentResolvers());
	}

	// Catch-all
	resolvers.add(new RequestParamMethodArgumentResolver(getBeanFactory(), true));

	return resolvers;
}
然后会初始化一些返回值处理器:
private List<HandlerMethodReturnValueHandler> getDefaultReturnValueHandlers() {
	List<HandlerMethodReturnValueHandler> handlers = new ArrayList<>();

	// Single-purpose return value types
	handlers.add(new ModelAndViewMethodReturnValueHandler());
	handlers.add(new ModelMethodProcessor());
	handlers.add(new ViewMethodReturnValueHandler());
	handlers.add(new ResponseBodyEmitterReturnValueHandler(getMessageConverters(),
				this.reactiveAdapterRegistry, this.taskExecutor, this.contentNegotiationManager));
	handlers.add(new StreamingResponseBodyReturnValueHandler());
	handlers.add(new HttpEntityMethodProcessor(getMessageConverters(),
				this.contentNegotiationManager, this.requestResponseBodyAdvice));
	handlers.add(new HttpHeadersReturnValueHandler());
	handlers.add(new CallableMethodReturnValueHandler());
	handlers.add(new DeferredResultMethodReturnValueHandler());
	handlers.add(new AsyncTaskMethodReturnValueHandler(this.beanFactory));

	// Annotation-based return value types
	handlers.add(new ModelAttributeMethodProcessor(false));
	handlers.add(new RequestResponseBodyMethodProcessor(getMessageConverters(),
				this.contentNegotiationManager, this.requestResponseBodyAdvice));

	// Multi-purpose return value types
	handlers.add(new ViewNameMethodReturnValueHandler());
	handlers.add(new MapMethodProcessor());

	// Custom return value types
	if (getCustomReturnValueHandlers() != null) {
		handlers.addAll(getCustomReturnValueHandlers());
	}

	// Catch-all
	if (!CollectionUtils.isEmpty(getModelAndViewResolvers())) {
		handlers.add(new ModelAndViewResolverMethodReturnValueHandler(getModelAndViewResolvers()));
	}
	else {
		handlers.add(new ModelAttributeMethodProcessor(true));
	}

	return handlers;
}
HandlerAdapter后续会在详细介绍DispatcherServlet的工作流程中详细分析工作原理。
(6)、HandlerExceptionResolver异常处理器
该接口的信息如下:

HandlerExceptionResolver根据代码注释说明是表示在HandlerMapping中出现异常的时候会通过这个处理器来处理异常,返回相应的ModelAndView
(7)、RequestToViewNameTranslator处理器
暂时先不介绍。
(8)、ViewResolver视图解析器
该类的结构如下:

ViewResolver主要是用来通过名字解析到视图。后续会详细说明其原理。
(8)、FlashMapManager
暂时不做介绍。